Free Practice Questions for the Nutanix Certified Professional (NCP) NCP-US-6.5 Exam (2026 Updated)
At Marks4sure, we are dedicated to providing IT professionals with the most accurate and reliable preparation materials for the Nutanix NCP-US-6.5 exam. To support your certification journey, we have made a selection of our premium 2026 Nutanix Certified Professional (NCP) practice questions and answers available completely free. You can take this practice test as many times as you need. Every question includes a detailed, expertly verified explanation to ensure you fully grasp the core security concepts before test day.
A healthcare administrator configure a Nutanix cluster with the following requirements:
• Enable for long-term data retention of large files
• Data should be kept for two years
• Deletion or overwrite of the data must not be allowed
Which Nutanix-enabled technology should the administrator employ to satisfy these requirements?
Users are complaining about having to reconnecting to share when there are networking issues.
Which files feature should the administrator enable to ensure the sessions will auto-reconnect in such events?
A company uses Linux and Windows workstations. The administrator is evaluating solution for their file storage needs.
The solution should support these requirements:
• Distributed File System
• Active Directory integrated
• Scale out architecture
Which tool allows a report on file sizes to be automatically generated on a weekly basis?
An administrator is looking for a tool that includes these features:
• Permission Denials
• Top 5 Active Users
• Top 5 Accessed Files
• File Distribution by Type
Nutanix tool should the administrator choose?
An administrator needs to allow individual users to restore files and folders hosted in Files.
How can the administrator meet this requirement?
An administrator has received an alert AI60068 – ADSDuplicationIPDetected details of alert as follows:
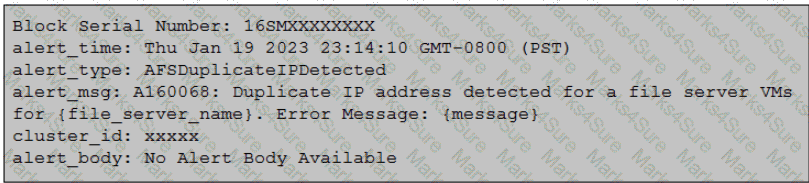
Which error log should the administrator review to determine the related Duplicate IP address involved?
An administrator needs to enable a Nutanix feature that will ensure automatic client reconnection to shares whenever there are intermittent server-side networking issues and FSVM HA events. Which Files feature should the administrator enable?
What is the most efficient way of enabling users to restore their files without administrator intervention in multiple Files shares?
An administrator needs to improve the performance for Volume Group storage connected to a group of VMs with intensive I/O. Which vg.update vg_name command parameter should be used to distribute the I/O across multiple CVMs?
An administrator has been tasked with updating the cool-off interval of an existing WORM share from the default value to five minutes. How should the administrator complete this task?
An administrator has received reports of resource issues on a file server. The administrator needs to review the following graphs, as displayed in the exhibit:
Storage Used
Open Connections
Number of Files
Top Shares by Current Capacity
Top Shares by Current Connections Where should the administrator complete this action?
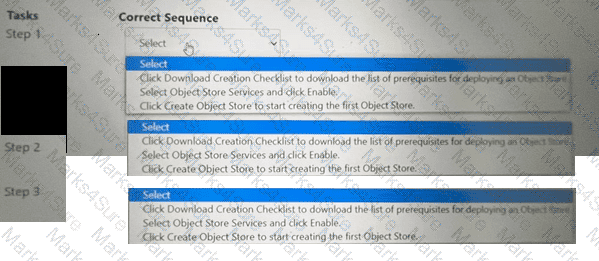
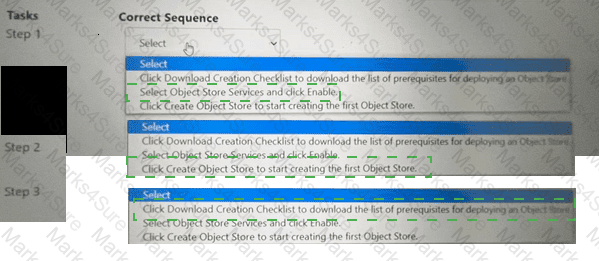
Within the Prism Central Entity > Services > Objects menu option, what is the correct task order for creating an object storage?
An administrator has been tasked with creating a distributed share on a single-node cluster, but has been unable to successfully complete the task.
Why is this task failing?
What tool can be used to report on a specific user ' s activity within a Files environment?
An administrator needs to generate a File Analytics report which lists the top owners with space consumed. Which two formats are available to the administrator for this task? (Choose two.)
An administrator is able to review and modify objects in a registered ESXI cluster from a PE instance, but when the administrator attempts to deploy an Objects cluster to the same ESXi cluster, the error that is shown in the exhibit is shown.
What is the appropriate configuration to verify to allow successful Objects cluster deployment to this ESXi cluster?
An organization currently has a Files cluster for their office data including all department shares. Most of the data is considered cold Data and they are looking to migrate to free up space for future growth or newer data.
The organization has recently added an additional node with more storage. In addition, the organization is using the Public Cloud for .. storage needs.
What will be the best way to achieve this requirement?
Which two prerequisites are needed when deploying Objects to a Nutanix cluster? (Choose two.)
PDF + Testing Engine

Testing Engine
PDF (Q&A)