A vendor needs an EIB that uses a custom report to output a list of new hires and their child dependent(s). You have been asked to create a calculated field that will be used to add only child dependent(s).
Which calculated field functions do you need to accomplish this?
Text Constant, True/False Condition, Evaluate Expression
True/False Condition, Evaluate Expression
Text Constant, True/False Condition, Extract Multi-Instance
True/False Condition, Extract Multi-Instance
In this case, you're asked to create a calculated field that:
Filters dependent records
Includes only child relationships
This means:
The worker has multiple dependents (a multi-instance field).
You need to extract only those dependent(s) where the relationship is “Child”.
To achieve this in Workday, use:
True/False Condition → check if the relationship descriptor = "Child"
Extract Multi-Instance → filters the multi-instance field (Dependents) using the above condition to return only matching records
This two-step logic filters multi-instance relationships correctly.
Why the other options are incorrect:
A and B are missing Extract Multi-Instance, which is required to filter multi-values.
C includes Text Constant unnecessarily — only True/False Condition and Extract Multi-Instance are required.
Refer to the following scenario to answer the question below.
You have configured a Core Connector: Worker integration, which utilizes the following basic configuration:
• Integration field attributes are configured to output the Position Title and Business Title fields from the Position Data section.
• Integration Population Eligibility uses the field Is Manager which returns true if the worker holds a manager role.
• Transaction Log service has been configured to Subscribe to specific Transaction Types: Position Edit Event. You launch your integration with the following date launch parameters (Date format of MM/DD/YYYY):
• As of Entry Moment: 05/25/2024 12:00:00 AM
• Effective Date: 05/25/2024
• Last Successful As of Entry Moment: 05/23/2024 12:00:00 AM
• Last Successful Effective Date: 05/23/2024
To test your integration you made a change to a worker named Jared Ellis who is assigned to the manager role for the IT Help Desk department. You perform an Edit Position on Jared and update the Job Profile of the position to a new value. Jared Ellis' worker history shows the Edit Position Event as being successfully completed with an effective date of 05/24/2024 and an Entry Moment of 05/24/2024 07:58:53 AM however Jared Ellis does not show up in your output.
What configuration element would have to be modified for the integration to include Jared Ellis in the output?
Integration Population Eligibility
Integration Field Attributes
Date launch parameters
Transaction log subscription
The scenario describes a Core Connector: Worker integration configured to output specific fields (Position Title and Business Title) for workers who meet the Integration Population Eligibility criteria (Is Manager = true) and where the Transaction Log service is subscribed to the "Position Edit Event." The integration is launched with specific date parameters, and a test edit is made to Jared Ellis’ position, who is a manager. However, despite the edit being completed with an effective date of 05/24/2024 and an entry moment of 05/24/2024 07:58:53 AM, Jared does not appear in the output. Let’s analyze why and determine the correct configuration element to modify.
In Workday integrations, the Core Connector: Worker uses change detection mechanisms to identify and process updates based on the Transaction Log and date launch parameters. The Transaction Log service captures events such as the "Position Edit Event" and records them with an Effective Date (when the change takes effect) and an Entry Moment (when the change was entered into the system). The integration’s date launch parameters define the time window for which changes are retrieved:
As of Entry Moment: 05/25/2024 12:00:00 AM – This specifies the latest point in time for when changes were entered into Workday.
Effective Date: 05/25/2024 – This defines the date for which the changes are effective.
Last Successful As of Entry Moment: 05/23/2024 12:00:00 AM – This indicates the starting point for entry moments from the last successful run.
Last Successful Effective Date: 05/23/2024 – This indicates the starting point for effective dates from the last successful run.
For an incremental run (like this one, since "Last Successful" parameters are provided), Workday processes changes where the Entry Moment falls between the Last Successful As of Entry Moment (05/23/2024 12:00:00 AM) and the As of Entry Moment (05/25/2024 12:00:00 AM), and where the Effective Date falls between the Last Successful Effective Date (05/23/2024) and the Effective Date (05/25/2024).
Now, let’s evaluate Jared Ellis’ edit:
Entry Moment: 05/24/2024 07:58:53 AM – This falls within the range of 05/23/2024 12:00:00 AM to 05/25/2024 12:00:00 AM.
Effective Date: 05/24/2024 – This falls within the range of 05/23/2024 to 05/25/2024.
At first glance, Jared’s edit seems to fit the date parameter window. However, the issue lies in the time component of the date launch parameters. Workday interprets these parameters with precision down to the second. The As of Entry Moment is set to 05/25/2024 12:00:00 AM (midnight), which is the very start of May 25, 2024. Jared’s Entry Moment of 05/24/2024 07:58:53 AM is correctly within the range from 05/23/2024 12:00:00 AM to 05/25/2024 12:00:00 AM. However, the Transaction Log subscription to "Position Edit Event" relies on the change being fully processed and available in the log by the time the integration runs.
The integration might have run at a point where the effective date window or the subscription logic did not correctly capture the event due to a mismatch in how the Effective Date is evaluated against the Last Successful Effective Date. Specifically, if the integration only processes changes with an Effective Date strictly after the Last Successful Effective Date (05/23/2024) up to the Effective Date (05/25/2024), and the logic excludes changes effective exactly on 05/24/2024 due to a boundary condition or a timing issue in the transaction log, Jared’s change might not be picked up.
To resolve this, modifying the Date launch parameters is necessary. Adjusting the As of Entry Moment to a later time (e.g., 05/25/2024 11:59:59 PM) or ensuring the Effective Date range explicitly includes all changes effective on or after 05/23/2024 through 05/25/2024 would ensure Jared’s edit is captured. This adjustment aligns the time window to include all relevant transactions logged before the integration run.
Let’s evaluate the other options:
A. Integration Population Eligibility: This is set to "Is Manager = true," and Jared is a manager. This filter is working correctly and does not need modification.
B. Integration Field Attributes: These are configured to output Position Title and Business Title, and the edit was to the Job Profile (part of Position Data). The fields are appropriately configured, so this is not the issue.
D. Transaction Log Subscription: The subscription is set to "Position Edit Event," which matches Jared’s edit. The subscription type is correct, so no change is needed here.
Thus, the issue stems from the date launch parameters not fully encompassing the timing of Jared’s edit in the Transaction Log, making C. Date launch parameters the correct answer.
Workday Pro Integrations Study Guide References
Workday Integrations Study Guide: Core Connector: Worker – Section on "Change Detection Using Transaction Log" explains how Transaction Log subscriptions filter events based on date parameters.
Workday Integrations Study Guide: Launch Parameters – Details the role of "As of Entry Moment" and "Effective Date" in defining the scope of incremental runs.
Workday Integrations Study Guide: Incremental Processing – Describes how "Last Successful" parameters establish the baseline for detecting changes in subsequent runs.
What is the workflow to chain a Document Transformation system to a Connector integration for the purpose of transforming the output?
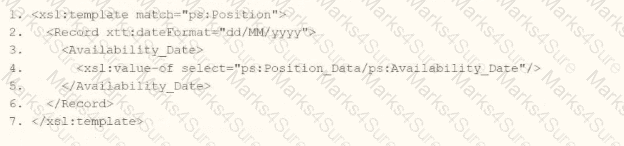
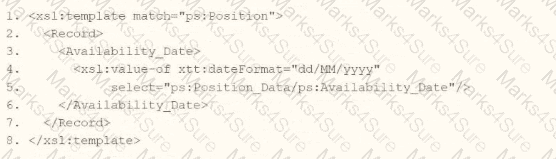
Add a Service step of Fire Integration to the Document Transformation (DT) Business Process (BP)
Add an Integration step to the Connector Business Process (BP)
Add an Integration step to the Document Transformation (DT) Business Process (BP)
Add a Service step of Fire Integration to the Connector Business Process (BP)
To chain a Document Transformation system to a Connector Integration, you must configure the Connector Integration System’s Business Process (BP) to include a "Service step of Fire Integration", which triggers the Document Transformation after the connector completes.
From Workday documentation:
“To execute a Document Transformation after a connector integration, use the Fire Integration service step in the connector’s business process to trigger the Document Transformation integration.”
This allows Workday to chain multiple integrations, such as taking the output of a Core Connector and sending it through a transformation step (e.g., XSLT) before delivering to an endpoint.
Why other options are incorrect:
A. Fire Integration in the DT BP is not used to call itself.
B. "Integration step" in BP is not a valid step type.
C. Same issue — DT’s own BP doesn’t call itself or other integrations.
What is the purpose of a namespace in the context of a stylesheet?
Provides elements you can use in your code.
Indicates the start and end tag names to output.
Restricts the data the processor can access.
Controls the filename of the transformed result.
In the context of a stylesheet, particularly within Workday's Document Transformation system where XSLT (Extensible Stylesheet Language Transformations) is commonly used, a namespace serves a critical role in defining the scope and identity of elements and attributes. The correct answer, as aligned with Workday’s integration practices and standard XSLT principles, is that a namespace "provides elements you can use in your code." Here’s a detailed explanation:
Definition and Purpose of a Namespace:
A namespace in an XML-based stylesheet (like XSLT) is a mechanism to avoid naming conflicts by grouping elements and attributes under a unique identifier, typically a URI (Uniform Resource Identifier). This allows different vocabularies or schemas to coexist within the same document or transformation process without ambiguity.
In XSLT, namespaces are declared in the stylesheet using the xmlns attribute (e.g., xmlns:xsl="http://www.w3.org/1999/XSL/Transform " for XSLT itself). These declarations define the set of elements and functions available for use in the stylesheet, such as
For example, when transforming Workday data (which uses its own XML schema), a namespace might be defined to reference Workday-specific elements, enabling the stylesheet to correctly identify and manipulate those elements.
Application in Workday Context:
In Workday’s Document Transformation integrations, namespaces are essential when processing XML data from Workday (e.g., Core Connector outputs) or external systems. The namespace ensures that the XSLT processor recognizes the correct elements from the source XML and applies the transformation rules appropriately.
Without a namespace, the processor might misinterpret elements with the same name but different meanings (e.g.,
Why Other Options Are Incorrect:
B. Indicates the start and end tag names to output: This is incorrect because namespaces do not dictate the structure (start and end tags) of the output. That is determined by the XSLT template rules and output instructions (e.g.,
C. Restricts the data the processor can access: While namespaces help distinguish between different sets of elements, they do not inherently restrict data access. Restrictions are more a function of security settings or XPath expressions within the stylesheet, not the namespace itself.
D. Controls the filename of the transformed result: Namespaces have no bearing on the filename of the output. In Workday, the filename of a transformed result is typically managed by the Integration Attachment Service or delivery settings (e.g., SFTP or email configurations), not the stylesheet’s namespace.
Practical Example:
Suppose you’re transforming a Workday XML file containing employee data into a custom format. The stylesheet might include:
Here, the wd namespace provides access to Workday-specific elements like
Workday Pro Integrations Study Guide References:
Workday Integration System Fundamentals: Explains XML and XSLT basics, including the role of namespaces in identifying elements within stylesheets.
Document Transformation Module: Highlights how namespaces are used in XSLT to process Workday XML data, emphasizing their role in providing a vocabulary for transformation logic (e.g., "Understanding XSLT Namespaces").
Core Connectors and Document Transformation Course Manual: Includes examples of XSLT stylesheets where namespaces are declared to handle Workday-specific schemas, reinforcing that they provide usable elements.
Workday Community Documentation: Notes that namespaces are critical for ensuring compatibility between Workday’s XML output and external system requirements in transformation scenarios.
As of May 1, 2024 Brian Hill's annual salary is $60,000.00. On May 13, 2024 Brian Hill received a salary increase and data was entered into Workday at 2:00 PM the same day. The new salary amount is set to $90,000.00 with an effective date of May 10, 2024.
Run #1
Core Connector: Worker Integration System was launched as an ad-hoc manual run on May 13, 2024.
As of Entry Moment: 05/11/2024 2:00:00 PM
Effective Date: 05/11/2024
Last Successful As of Entry Moment: 05/09/2024 2:00:00 PM
Last Successful Effective Date: 05/09/2024
What will be the expected output in the Run #1 of the Core Connector: Worker Integration System?
Brian Hill will be excluded in the output file due to the Effective Date of his salary.
Brian Hill will be included in the output file. The salary amount will be $60,000.00.
Brian Hill will be excluded in the output file due to the Entry Moment of his salary.
Brian Hill will be included in the output file. The salary amount will be $90,000.00.
Let’s break this down:
Effective Date of salary change: May 10, 2024
Entry Moment (data entry timestamp): May 13, 2024, 2:00 PM
Integration Run As of Entry Moment: May 11, 2024, 2:00 PM
Salary data was entered AFTER this moment (May 13 vs May 11)
So based on Workday’s Change Detection logic:
A worker is included in the integration output only if the transaction was entered into Workday after the last successful entry moment, and the effective date is on or after the “Last Successful Effective Date”.
In this case:
Entry was made after the last As-of Entry Moment (May 13 > May 11)
Effective date (May 10) is after the last successful effective date (May 9)
Both conditions are met, so Brian Hill will be included, and the new salary of $90,000.00 will be reflected in the output.
Why other options are incorrect:
A. The effective date is valid.
B. $60,000 would be outdated.
C. Entry moment is after the As-of date, so not excluded.
Refer to the scenario. You are configuring a Core Connector: Worker integration with the Data Initialization Service (DIS) enabled, scheduled to run once daily. The integration must extract only active worker records with changes to compensation, home address, or business title since the last 24 hours. It uses Workday’s change detection to avoid full extracts.
During testing, the Core Connector: Worker DIS output unexpectedly includes terminated workers, even though the change detection date parameters are correctly defined for a Full-Diff extract. The requirements specify that only active workers should be included in the output.
What configuration step should you modify to ensure the integration excludes terminated workers?
Configure Integration Attributes for Integration System step to enable Include Inactive Workers in Full File.
Configure Integration Transaction Log step to subscribe to everything except termination transactions.
Configure Integration Population Eligibility step to filter out terminated employees.
Configure Integration Field Overrides step to use the correct Eligibility Criterion to filter out terminated employees.
This scenario addresses an issue where a Core Connector: Worker integration — with DIS enabled and Full-Diff mode configured — unexpectedly includes terminated workers in the output, despite a requirement to include only active workers.
The correct step to address this issue is the configuration of Integration Population Eligibility.
From the Workday Pro: Integrations – Core Connector Configuration Guide, the relevant extract states:
“The Integration Population Eligibility step allows users to define which workers or populations are eligible to be included in the integration output. This includes filtering by worker status, organization, supervisory org, or other eligibility criteria. If this is not configured to exclude terminated workers, the integration will include all workers who meet the event conditions, regardless of their current status.”
Even though the integration uses change detection and the correct launch parameters, Workday still considers any worker with a qualifying change, including those terminated, unless they are explicitly excluded via eligibility rules.
Therefore, to prevent terminated workers from appearing in the output, you must set a filter in the Integration Population Eligibility step to include only active workers (e.g., using Worker.Status = Active or similar criteria).
Incorrect Options Explained:
A. Configure Integration Attributes... Include Inactive Workers in Full FileThis option would cause inactive (e.g., terminated) workers to be included when enabled. It doesn’t help filter them out.
B. Configure Integration Transaction Log... subscribe to everything except terminationSubscription controls which events trigger processing but does not control population eligibility. Terminated workers with address changes prior to termination could still appear if eligibility is not defined.
D. Configure Integration Field Overrides... use Eligibility CriterionField Overrides change data mappings or formats, not population eligibility. It cannot exclude terminated workers.
What task is needed to build a sequence generator for an EIB integration?
Put Sequence Generator Rule Configuration
Create ID Definition/Sequence Generator
Edit Tenant Setup - Integrations
Configure Integration Sequence Generator Service
In Workday, a sequence generator is used to create unique, sequential identifiers for integration processes, such as Enterprise Interface Builders (EIBs). These identifiers are often needed to ensure data uniqueness or to meet external system requirements for tracking records. The question asks specifically about building a sequence generator for an EIB integration, so we need to identify the correct task based on Workday’s integration configuration framework.
Understanding Sequence Generators in Workday
A sequence generator in Workday generates sequential numbers or IDs based on predefined rules, such as starting number, increment, and format. These are commonly used in integrations to create unique identifiers for outbound or inbound data, ensuring consistency and compliance with external system requirements. For EIB integrations, sequence generators are typically configured as part of the integration setup to handle data sequencing or identifier generation.
Analyzing the Options
Let’s evaluate each option to determine which task is used to build a sequence generator for an EIB integration:
A. Put Sequence Generator Rule Configuration
Description: This option suggests configuring rules for a sequence generator, but "Put Sequence Generator Rule Configuration" is not a standard Workday task name or functionality. Workday uses specific nomenclature like "Create ID Definition/Sequence Generator" for sequence generator setup. This option seems vague or incorrect, as it doesn’t align with Workday’s documented tasks for sequence generators.
Why Not Correct?: It’s not a recognized Workday task, and sequence generator configuration is typically handled through a specific setup process, not a "put" or rule-based configuration in this context.
B. Create ID Definition/Sequence Generator
Description: This is a standard Workday task used to create and configure sequence generators. In Workday, you navigate to the "Create ID Definition/Sequence Generator" task under the Integrations or Setup domain to define a sequence generator. This task allows you to specify the starting number, increment, format (e.g., numeric, alphanumeric), and scope (e.g., tenant-wide or integration-specific). For EIB integrations, this task is used to generate unique IDs or sequences for data records.
Why Correct?: This task directly aligns with Workday’s documentation for setting up sequence generators, as outlined in integration guides. It’s the standard method for building a sequence generator for use in EIBs or other integrations.
C. Edit Tenant Setup - Integrations
Description: This task involves modifying broader tenant-level integration settings, such as enabling services, configuring security, or adjusting integration parameters. While sequence generators might be used within integrations, this task is too high-level and does not specifically address creating or configuring a sequence generator.
Why Not Correct?: It’s not granular enough for sequence generator setup; it focuses on tenant-wide integration configurations rather than the specific creation of a sequence generator.
D. Configure Integration Sequence Generator Service
Description: This option suggests configuring a service specifically for sequence generation within an integration. However, Workday does not use a task named "Configure Integration Sequence Generator Service." Sequence generators are typically set up as ID definitions, not as standalone services. This option appears to be a misnomer or non-standard terminology.
Why Not Correct?: It’s not a recognized Workday task, and sequence generators are configured via "Create ID Definition/Sequence Generator," not as a service configuration.
Conclusion
Based on Workday’s integration framework and documentation, the correct task for building a sequence generator for an EIB integration is B. Create ID Definition/Sequence Generator. This task allows you to define and configure the sequence generator with the necessary parameters (e.g., starting value, increment, format) for use in EIBs. This is a standard practice for ensuring unique identifiers in integrations, as described in Workday’s Pro Integrations training materials.
Surprising Insight
It’s interesting to note that Workday’s sequence generators are highly flexible, allowing customization for various use cases, such as generating employee IDs, transaction numbers, or integration-specific sequences. The simplicity of the "Create ID Definition/Sequence Generator" task makes it accessible even for non-technical users, which aligns with Workday’s no-code integration philosophy.
Key Citations
Workday Pro Integrations Study Guide, Module 3: EIB Configuration
Workday Integration Cloud Connect: Sequence Generators
Workday EIB and Sequence Generator Overview
Configuring Workday Integrations: ID Definitions
The following XML code was generated through a RaaS that will be used in an EIB.
Within a template that matches on wd:Report_Entry, what XPath expression do you use to select the value of the Relationship_ID element?
wd:Dependents_Group/wd:Relationship/wd:ID/wd:type='Relationship_ID'
wd:Dependents_Group/wd:Relationship/wd:ID
./wd:Dependents_Group/wd:Relationship/wd:ID
The XML fragment shown follows the Report‑as‑a‑Service (RaaS) structure typical for Workday custom report output:
Inside each
wd:Dependents_Group
→ wd:Relationship
→ wd:ID (wd:type="Relationship_ID")
When writing the template:
XSLT uses a relative XPath (starting with ./) to navigate from the matched node.
Therefore, the correct XPath should be:
/wd:Dependents_Group/wd:Relationship/wd:ID
That expression selects the wd:ID element so you can then test/extract where wd:type="Relationship_ID".
Why the other options are incorrect:
Option
Why Incorrect
A & B
These use an equality test incorrectly inside the XPath expression — they would not return the node value and are syntactically invalid for value extraction.
C
Missing ./ — would still work in many cases, but Workday XSLT best practice is to use relative paths when inside a match.
Workday Pro Integration guidance for RaaS/XSLT stresses:
Always scope node selection relative to the current context tree using prefix‑qualified XPath expressions.
You need to create a report that includes data from multiple business objects. For a supervisory organization specified at run time, the report must output one row per worker, their active benefit plans, and the names and ages of all related dependents. The Worker business object contains the Employee, Benefit Plans, and Dependents fields. The Dependent business object contains the employee's dependent's Name and Age fields.
How would you select the primary business object (PBO) and related business objects (RBO) for the report?
PBO: Dependent, RBO: Worker
PBO: Worker, RBO: Dependent
PBO: Dependent, no RBOs
PBO: Worker; no RBOs
In Workday reporting, selecting the appropriate Primary Business Object (PBO) and Related Business Objects (RBOs) is critical to ensure that the report retrieves and organizes data correctly based on the requirements. The requirement here is to create a report that outputs one row per worker for a specified supervisory organization, including their active benefit plans and the names and ages of all related dependents. The Worker business object contains fields like Employee, Benefit Plans, and Dependents, while the Dependent business object provides the Name and Age fields for dependents.
Why Worker as the PBO?The report needs to output "one row per worker," making the Worker business object the natural choice for the PBO. In Workday, the PBO defines the primary dataset and determines the granularity of the report (i.e., one row per instance of the PBO). Since the report revolves around workers and their associated data (benefit plans and dependents), Worker is the starting point. Additionally, the requirement specifies a supervisory organization at runtime, which is a filter applied to the Worker business object to limit the population.
Why Dependent as an RBO?The Worker business object includes a "Dependents" field, which is a multi-instance field linking to the Dependent business object. To access detailed dependent data (Name and Age), the Dependent business object must be added as an RBO. This allows the report to pull in the related dependent information for each worker. Without the Dependent RBO, the report could only reference the existence of dependents, not their specific attributes like Name and Age.
Analysis of Benefit Plans:The Worker business object already contains the "Benefit Plans" field, which provides access to active benefit plan data. Since this is a field directly available on the PBO (Worker), no additional RBO is needed to retrieve benefit plan information.
Option Analysis:
A. PBO: Dependent, RBO: Worker: Incorrect. If Dependent were the PBO, the report would output one row per dependent, not one row per worker, which contradicts the requirement. Additionally, Worker as an RBO would unnecessarily complicate accessing worker-level data.
B. PBO: Worker, RBO: Dependent: Correct. This aligns with the requirement: Worker as the PBO ensures one row per worker, and Dependent as the RBO provides access to dependent details (Name and Age). Benefit Plans are already accessible via the Worker PBO.
C. PBO: Dependent, no RBOs: Incorrect. This would result in one row per dependent and would not allow easy access to worker or benefit plan data, failing to meet the "one row per worker" requirement.
D. PBO: Worker, no RBOs: Incorrect. While Worker as the PBO is appropriate, omitting the Dependent RBO prevents the report from retrieving dependent Name and Age fields, which are stored in the Dependent business object, not directly on Worker.
Implementation:
Create a custom report with Worker as the PBO.
Add a filter for the supervisory organization (specified at runtime) on the Worker PBO.
Add Dependent as an RBO to access Name and Age fields.
Include columns from Worker (e.g., Employee, Benefit Plans) and Dependent (e.g., Name, Age).
References from Workday Pro Integrations Study Guide:
Workday Report Writer Fundamentals: Section on "Selecting Primary and Related Business Objects" explains how the PBO determines the report’s row structure and RBOs extend data access to related objects.
Integration System Fundamentals: Discusses how multi-instance fields (e.g., Dependents on Worker) require RBOs to retrieve detailed attributes.
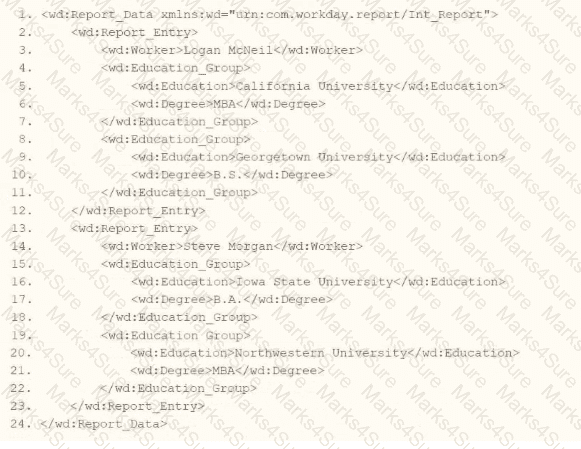
Refer to the following XML to answer the question below.
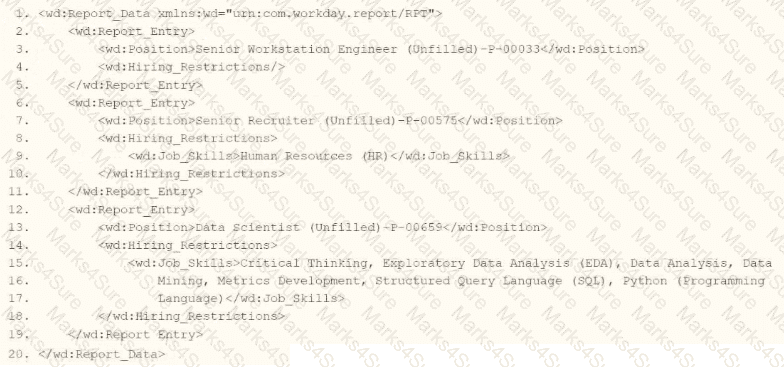
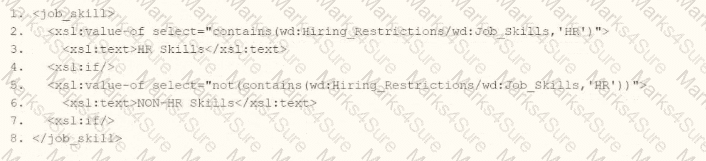
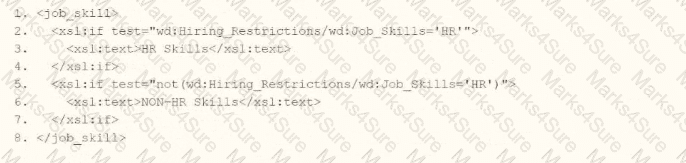
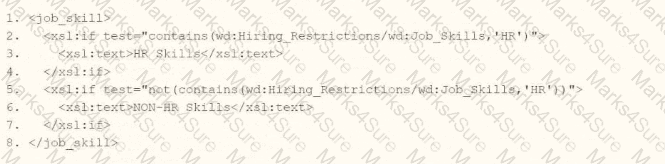
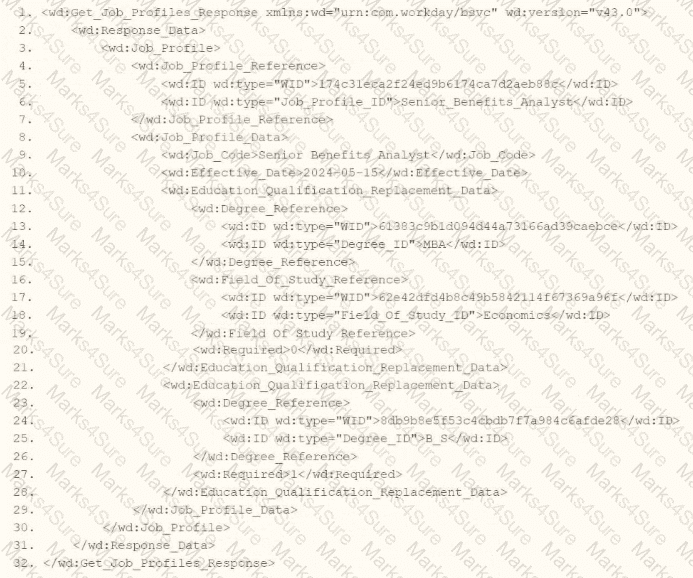
You are an integration developer and need to write XSLT to transform the output of an EIB which is using a web service enabled report to output worker data along with their dependents. You currently have a template which matches on wd:Report_Data/wd:Report_Entry for creating a record from each report entry.
Within the template which matches on wd:Report_Entry you would like to conditionally process the wd:Dependents_Group elements by using an
What XPath syntax would be used as the select for the apply templates so as to iterate over only the wd:Dependents_Group elements where the dependent relationship is Child?
wd:Dependents_Group[@wd:Relationship='Child']
wd:Dependents_Group[wd:Relationship='Child']
wd:Dependents_Group/wd:Relationship='Child'
wd:Dependents_Group/@wd:Relationship='Child'
In Workday integrations, XSLT (Extensible Stylesheet Language Transformations) is commonly used to transform XML data, such as the output from an Enterprise Interface Builder (EIB) or a web service-enabled report, into a format suitable for third-party systems. In this scenario, you are tasked with writing XSLT to process the wd:Dependents_Group elements within a report output to iterate only over those where the dependent relationship is "Child." The correct XPath syntax for the select attribute of an
Here’s why option B is correct:
XPath Syntax Explanation: In XPath, square brackets [ ] are used to specify predicates or conditions to filter elements. The condition wd:Relationship='Child' checks if the wd:Relationship element (or attribute, depending on the XML structure) has the value "Child." When applied to wd:Dependents_Group, the expression wd:Dependents_Group[wd:Relationship='Child'] selects only those wd:Dependents_Group elements that contain a wd:Relationship child element with the value "Child."
Context in XSLT: Within an
XML Structure Alignment: Based on the provided XML snippet, wd:Dependents_Group likely contains child elements or attributes, including wd:Relationship. The correct XPath assumes wd:Relationship is an element (not an attribute), as is common in Workday XML structures. Therefore, wd:Dependents_Group[wd:Relationship='Child'] is the appropriate syntax to filter and iterate over the desired elements.
Why not the other options?
A. wd:Dependents_Group[@wd:Relationship='Child']: This syntax uses @ to indicate that wd:Relationship is an attribute of wd:Dependents_Group, not an element. If wd:Relationship is not defined as an attribute in the XML (as is typical in Workday’s XML structure, where it’s often an element), this would result in no matches, making it incorrect.
C. wd:Dependents_Group/wd:Relationship='Child': This is not a valid XPath expression for a predicate. It attempts to navigate to wd:Relationship as a child but does not use square brackets [ ] to create a filtering condition. This would be interpreted as selecting wd:Relationship elements under wd:Dependents_Group, but it wouldn’t filter based on the value "Child" correctly within an
D. wd:Dependents_Group/@wd:Relationship='Child': Similar to option A, this assumes wd:Relationship is an attribute, which may not match the XML structure. Additionally, it lacks the predicate structure [ ], making it invalid for filtering in this context.
To implement this in XSLT:
You would write an
This approach ensures the XSLT transformation aligns with Workday’s XML structure and integration requirements for processing worker data and dependents in an EIB or web service-enabled report.
Workday Pro Integrations Study Guide: Section on "XSLT Transformations for Workday Integrations" – Details the use of XPath in XSLT for filtering XML elements, including predicates for conditional processing.
Workday EIB and Web Services Guide: Chapter on "XML and XSLT for Report Data" – Explains the structure of Workday XML (e.g., wd:Dependents_Group, wd:Relationship) and how to use XPath to navigate and filter data.
Workday Reporting and Analytics Guide: Section on "Web Service-Enabled Reports" – Covers integrating report outputs with XSLT for transformations, including examples of filtering elements based on values.
This is the XML file generated from a Core Connector; Positions integration.
When performing an XSLT Transformation on the Core Connector: Positions XML output file, you want to show a hyperlink of positions that are not available for hiring as an entry in the Message tab.
What are all the needed ETV items to meet the above requirements?


In Workday integrations, the Extension for Transformation and Validation (ETV) framework is used within XSLT transformations to apply validation and formatting rules to XML data, such as the output from a Core Connector (e.g., Positions integration). In this scenario, you need to perform an XSLT transformation on the Core Connector: Positions XML output file to display a hyperlink for positions that are not available for hiring as an entry in the Message tab. This requires configuring ETV attributes to ensure the data is present and correctly targeted for the hyperlink.
Here’s why option B is correct:
Requirement Analysis: The requirement specifies showing a hyperlink for positions "not available for hiring." In the provided XML, the ps:Available_For_Hire field under ps:Position_Data indicates whether a position is available for hire (e.g.,
ETV Attributes:
etv:required="true": This ensures that the ps:WID value under ps:Additional_Information is mandatory for the transformation. If the WID is missing, the transformation will fail or generate an error, ensuring that the hyperlink can be created only for valid positions with an associated WID.
etv:target="[ps:Additional_Information/ps:WID]": This specifies that the target of the transformation (e.g., the hyperlink) should be the WID value found at ps:Additional_Information/ps:WID in the XML. This WID can be used to construct a hyperlink to the position in Workday, meeting the requirement to show a hyperlink for positions not available for hiring.
Context in XML: The XML shows ps:Additional_Information containing ps:WID (e.g.,
Why not the other options?
A.
etv:minLength="0"
etv:targetWID="[ps:Additional_Information/ps:WID]"
etv:minLength="0" allows the WID to be empty or have zero length, which contradicts the need for a valid WID to create a hyperlink. It does not ensure the data is present, making it unsuitable. Additionally, etv:targetWID is not a standard ETV attribute; the correct attribute is etv:target, making this option incorrect.
C.
etv:minLength="0"
etv:target="[ps:Additional_Information/ps:WID]"
Similar to option A, etv:minLength="0" allows the WID to be empty, which does not meet the requirement for a mandatory WID to create a hyperlink. This makes it incorrect, as the hyperlink would fail if the WID is missing.
D.
etv:required="true"
etv:targetWID="[ps:Additional_Information/ps:WID]"
While etv:required="true" ensures the WID is present, etv:targetWID is not a standard ETV attribute. The correct attribute is etv:target, making this option syntactically incorrect and unsuitable for the transformation.
To implement this in XSLT for a Workday integration:
Use the ETV attributes from option B (etv:required="true" and etv:target="[ps:Additional_Information/ps:WID]") within your XSLT template to validate and target the ps:WID for positions where ps:Available_For_Hire is false. This ensures the transformation generates a valid hyperlink in the Message tab, linking to the position’s WID in Workday.
Workday Pro Integrations Study Guide: Section on "ETV in XSLT Transformations" – Details the use of ETV attributes like required and target for validating and targeting data in Workday XML, including handling identifiers like WID for hyperlinks.
Workday Core Connector and EIB Guide: Chapter on "XML Transformations" – Explains how to use ETV attributes in XSLT to process position data, including creating messages or hyperlinks based on conditions like Available_For_Hire.
Workday Integration System Fundamentals: Section on "ETV for Message Generation" – Covers applying ETV attributes to generate hyperlinks in the Message tab, ensuring data integrity and correct targeting of Workday identifiers like WID.
Refer to the following scenario to answer the question below.
You have been asked to build an integration using the Core Connector: Worker template and should leverage the Data Initialization Service (DIS). The integration will be used to export a full file (no change detection) for employees only and will include personal data.
What configuration is required to ensure that when outputting phone number only the home phone number is included in the output?
Configure an integration map to map the phone type.
Include the phone type integration field attribute.
Configure the phone type integration attribute.
Configure an integration field override to include phone type.
The scenario involves a Core Connector: Worker integration using DIS to export a full file of employee personal data, with the requirement to output only the home phone number when including phone data. Workday’s "Phone Number" field is multi-instance, meaning a worker can have multiple phone types (e.g., Home, Work, Mobile). Let’s determine the configuration:
Requirement:Filter the multi-instance "Phone Number" field to include only the "Home" phone number in the output file. This involves specifying which instance of the phone data to extract.
Integration Field Attributes:In Core Connectors, Integration Field Attributes allow you to refine how multi-instance fields are handled in the output. For the "Phone Number" field, you can set an attribute like "Phone Type" to "Home" to ensure only home phone numbers are included. This is a field-level configuration that filters instances without requiring a calculated field or override.
Option Analysis:
A. Configure an integration map to map the phone type: Incorrect. Integration Maps transform field values (e.g., "United States" to "USA"), not filter multi-instance data like selecting a specific phone type.
B. Include the phone type integration field attribute: Correct. This configures the "Phone Number" field to output only instances where the phone type is "Home," directly meeting the requirement.
C. Configure the phone type integration attribute: Incorrect. "Integration attribute" refers to integration-level settings (e.g., file format), not field-specific configurations. The correct term is "integration field attribute."
D. Configure an integration field override to include phone type: Incorrect. Integration Field Overrides are used to replace a field’s value with a calculated field or custom value, not to filter multi-instance data like phone type.
Implementation:
Edit the Core Connector: Worker integration.
Navigate to the Integration Field Attributes section for the "Phone Number" field.
Set the "Phone Type" attribute to "Home" (or equivalent reference ID for Home phone).
Test the output file to confirm only home phone numbers are included.
References from Workday Pro Integrations Study Guide:
Core Connectors & Document Transformation: Section on "Integration Field Attributes" explains filtering multi-instance fields like phone numbers by type.
Integration System Fundamentals: Notes how Core Connectors handle multi-instance data with field-level attributes.
A calculated field used as a field override in a Connector is not appearing in the output. Assuming the field has a value, what could cause this to occur?
Access not provided to calculated field data source.
Access not provided to all fields in the calculated field.
Access not provided to Connector calculated field web service.
Access not provided to all instances of calculated field.
This question addresses a troubleshooting scenario in Workday Pro Integrations, where a calculated field used as a field override in a Connector does not appear in the output, despite having a value. Let’s analyze the potential causes and evaluate each option.
Understanding Calculated Fields and Connectors in Workday
Calculated Fields: In Workday, calculated fields are custom fields created using Workday’s expression language to derive values based on other fields, conditions, or functions. They are often used in reports, integrations, and business processes to transform or aggregate data. Calculated fields can reference other fields (data sources) and require appropriate security permissions to access those underlying fields.
Field Override in Connectors: In a Core Connector or other integration system, a field override allows you to replace or supplement a default field with a custom value, such as a calculated field. This is configured in the integration’s mapping or transformation steps, ensuring the output includes the desired data. However, for the calculated field to appear in the output, it must be accessible, have a valid value, and be properly configured in the integration.
Issue: Calculated Field Not Appearing in Output: If the calculated field has a value but doesn’t appear in the Connector’s output, the issue likely relates to security, configuration, or access restrictions. The question assumes the field has a value, so we focus on permissions or setup errors rather than data issues.
Evaluating Each Option
Let’s assess each option based on Workday’s integration and security model:
Option A: Access not provided to calculated field data source.
Analysis: This is partially related but incorrect as the primary cause. Calculated fields often rely on underlying data sources (e.g., worker data, organization data) to compute their values. If access to the data source is restricted, the calculated field might not compute correctly or appear in the output. However, the question specifies the field has a value, implying the data source is accessible. The more specific issue is likely access to the individual fields within the calculated field’s expression, not just the broader data source.
Why It Doesn’t Fit: While data source access is important, it’s too general here. The calculated field’s value exists, suggesting the data source is accessible, but the problem lies in finer-grained permissions for the fields used in the calculation.
Option B: Access not provided to all fields in the calculated field.
Analysis: This is correct. Calculated fields in Workday are expressions that reference one or more fields (e.g., Worker_ID + Position_Title). For the calculated field to be used in a Connector’s output, the ISU (via its ISSG) must have access to all fields referenced in the calculation. If any field lacks "Get" or "View" permission in the relevant domain (e.g., Worker Data), the calculated field won’t appear in the output, even if it has a value. This is a common security issue in integrations, as ISSGs must be configured with domain access for every field involved.
Why It Fits: Workday’s security model requires granular permissions. For example, if a calculated field combines Worker_Name and Hire_Date, the ISU needs access to both fields’ domains. If Hire_Date is restricted, the calculated field fails to output, even with a value. This aligns with the scenario and is a frequent troubleshooting point in Workday Pro Integrations.
Option C: Access not provided to Connector calculated field web service.
Analysis: This is incorrect. There isn’t a specific "Connector calculated field web service" in Workday. Calculated fields are part of the integration’s configuration, not a separate web service. The web service operation used by the Connector (e.g., Get_Workers) must have permissions, but this relates to the overall integration, not the calculated field specifically. The issue here is field-level access, not a web service restriction.
Why It Doesn’t Fit: This option misinterprets Workday’s architecture. Calculated fields are configured within the integration, not as standalone web services, making this irrelevant to the problem.
Option D: Access not provided to all instances of calculated field.
Analysis: This is incorrect. The concept of "instances" typically applies to data records (e.g., all worker records), not calculated fields themselves. Calculated fields are expressions, not data instances, so there’s no need for "instance-level" access. The issue is about field-level permissions within the calculated field’s expression, not instances of the field. This option misunderstands Workday’s security model for calculated fields.
Why It Doesn’t Fit: Calculated fields don’t have "instances" requiring separate access; they depend on the fields they reference, making this option inaccurate.
Final Verification
The correct answer is Option B, as the calculated field’s absence in the output is likely due to the ISU lacking access to all fields referenced in the calculated field’s expression. For example, if the calculated field in a Core Connector: Worker Data combines Worker_ID and Department_Name, the ISSG must have "Get" access to both the Worker Data and Organization Data domains. If Department_Name is restricted, the calculated field won’t output, even with a value. This is a common security configuration issue in Workday integrations, addressed by reviewing and adjusting ISSG domain permissions.
This aligns with Workday’s security model, where granular permissions are required for all data elements, as seen in Questions 26 and 28. The assumption that the field has a value rules out data or configuration errors, focusing on security as the cause.
Supporting Documentation
The reasoning is based on:
Workday Community documentation on calculated fields, security domains, and integration mappings.
Tutorials on configuring Connectors and troubleshooting, such as Workday Advanced Studio Tutorial, highlighting field access issues.
Integration security guides from partners (e.g., NetIQ, Microsoft Learn, Reco.ai) detailing ISSG permissions for fields in calculated expressions.
Community discussions on Reddit and Workday forums on calculated field troubleshooting (r/workday on Reddit).
Refer to the following XML data source to answer the question below.
You need the integration file to format the ps:Position_ID field to 10 characters, truncate the value if it exceeds, and align everything to the left.
How will you start your template match on ps:Position to use Document Transformation (DT) to do the transformation using XTT?


In Workday integrations, Document Transformation (DT) using XSLT with Workday Transformation Toolkit (XTT) attributes is used to transform XML data, such as the output from a Core Connector or EIB, into a specific format for third-party systems. In this scenario, you need to transform the ps:Position_ID field within the ps:Position element to a fixed length of 10 characters, truncate the value if it exceeds 10 characters, and align the output to the left. The template must match the ps:Position element and apply these formatting rules using XTT attributes.
Here’s why option A is correct:
Template Matching: The
XTT Attributes:
xtt:fixedLength="10" specifies that the Pos_ID field should be formatted to a fixed length of 10 characters. If the ps:Position_ID value exceeds 10 characters, it will be truncated (by default, XTT truncates without raising an error unless explicitly configured otherwise), meeting the requirement to truncate if the value exceeds.
xtt:align="left" ensures that the output is left-aligned within the 10-character field, aligning with the requirement to align everything to the left.
XPath Selection: The
Output Structure: The
Why not the other options?
B.
xml
WrapCopy
This applies xtt:align="left" to the xsl:template element instead of the Pos_ID element. XTT attributes like fixedLength and align must be applied directly to the element being formatted (Pos_ID), not the template itself, making this incorrect.
C.
xml
WrapCopy
This applies xtt:fixedLength="10" to the Position element and xtt:align="left" to Pos_ID. However, XTT attributes like fixedLength and align should be applied to the specific field being formatted (Pos_ID), not the parent element (Position). This misplacement makes it incorrect.
D.
xml
WrapCopy
This applies xtt:fixedLength="10" to the xsl:template element and xtt:align="left" to Pos_ID. Similar to option B, XTT attributes must be applied to the specific element (Pos_ID) being formatted, not the template itself, making this incorrect.
To implement this in XSLT for a Workday integration:
Use the template from option A to match ps:Position, apply xtt:fixedLength="10" and xtt:align="left" to the Pos_ID element, and extract the ps:Position_ID value using the correct XPath. This ensures the ps:Position_ID (e.g., "P-00030") is formatted to 10 characters, truncated if necessary, and left-aligned, meeting the integration file requirements.
Workday Pro Integrations Study Guide: Section on "Document Transformation (DT) and XTT" – Details the use of XTT attributes like fixedLength and align for formatting data in XSLT transformations, including truncation behavior.
Workday Core Connector and EIB Guide: Chapter on "XML Transformations" – Explains how to use XSLT templates with XTT attributes to transform position data, including fixed-length formatting and alignment.
Workday Integration System Fundamentals: Section on "XTT in Integrations" – Covers the application of XTT attributes to specific fields in XML for integration outputs, ensuring compliance with formatting requirements like length and alignment.
Refer to the following scenario to answer the question below.
You need to configure a Core Connector: Candidate Outbound integration for your vendor. The connector requires the data initialization service (DIS).
The vendor requests additional formatting of the candidate Country field. For example, if a candidate's country is the United States of America, the output should show USA.
What steps do you follow to meet this request?
Use an Evaluated Expression calculation and add it to the integration's report data source.
Use the integration related action Configure Integration Population Eligibility.
Use the integration services to only output shortened country codes.
Use the integration related action Configure Integration Maps.
The scenario involves a Core Connector: Candidate Outbound integration with the Data Initialization Service (DIS), where the vendor requires the "Country" field to be formatted differently (e.g., "United States of America" to "USA"). This is a data transformation requirement, and Core Connectors provide specific tools to handle such formatting. Let’s evaluate the solution:
Requirement:The vendor needs a shortened country code (e.g., "USA" instead of "United States of America") in the output file. This involves transforming the delivered "Country" field value from the Candidate business object into a vendor-specific format.
Integration Maps:In Workday Core Connectors, integration maps are used to transform or map field values from Workday’s format to a vendor’s required format. For example, you can create a map that replaces "United States of America" with "USA," "Canada" with "CAN," etc. This is configured via the "Configure Integration Maps" related action on the integration system, allowing you to define a lookup table or rule-based transformation for the Country field.
Option Analysis:
A. Use an Evaluated Expression calculation and add it to the integration’s report data source: Incorrect. While an Evaluate Expression calculated field could transform the value (e.g., if-then logic), Core Connectors don’t directly use report data sources for output formatting. Calculated fields are better suited for custom reports or EIBs, not Core Connector field mapping.
B. Use the integration related action Configure Integration Population Eligibility: Incorrect. This action filters the population of candidates included (e.g., based on eligibility criteria), not the formatting of individual fields like Country.
C. Use the integration services to only output shortened country codes: Incorrect. Integration services define the dataset or events triggering the integration, not field-level formatting or transformations.
D. Use the integration related action Configure Integration Maps: Correct. Integration maps are the standard Core Connector tool for transforming field values (e.g., mapping "United States of America" to "USA") to meet vendor requirements.
Implementation:
Navigate to the Core Connector: Candidate Outbound integration system.
Use the related action Configure Integration Maps.
Create a new map for the "Country" field (e.g., Source Value: "United States of America," Target Value: "USA").
Apply the map to the Country field in the integration output.
Test the output file to ensure the transformed value (e.g., "USA") appears correctly.
References from Workday Pro Integrations Study Guide:
Core Connectors & Document Transformation: Section on "Configuring Integration Maps" details how to transform field values for vendor-specific formatting.
Integration System Fundamentals: Explains how Core Connectors handle data transformation through maps rather than calculated fields or services for field-level changes.
Which three features must all XSLT files contain to be considered valid?
A root element, namespace, and at least one transformation
A root element, namespace, and at least one template
A header, a footer, and a namespace
A template, a prefix, and a header
For an XSLT (Extensible Stylesheet Language Transformations) file to be considered valid in the context of Workday integrations (and per general XSLT standards), it must adhere to specific structural and functional requirements. The correct answer is that an XSLT file must contain a root element, a namespace, and at least one template. Below is a detailed explanation of why this is the case, grounded in Workday’s integration practices and XSLT specifications:
Root Element:
Every valid XSLT file must have a single root element, which serves as the top-level container for the stylesheet. In XSLT, this is typically the
The root element defines the structure of the XSLT document and encapsulates all other elements, such as templates and namespaces. Without a root element, the file would not conform to XML well-formedness rules, which are a prerequisite for XSLT validity.
Example:
Namespace:
An XSLT file must declare the XSLT namespace, typically http://www.w3.org/1999/XSL/Transform, to identify it as an XSLT stylesheet and enable the processor to recognize XSLT-specific elements (e.g.,
The namespace ensures that the elements used in the stylesheet are interpreted as XSLT instructions rather than arbitrary XML. Without this namespace, the file would not function as an XSLT stylesheet, as the processor would not know how to process its contents.
In Workday’s Document Transformation integrations, additional namespaces (e.g., for Workday-specific schemas) may also be included, but the XSLT namespace is mandatory for validity.
At Least One Template:
An XSLT file must contain at least one
Without at least one template, the stylesheet would lack any transformation capability, rendering it functionally invalid for its intended purpose. Even a minimal XSLT file requires a template to produce meaningful output, though built-in default templates exist, they are insufficient for custom transformations like those used in Workday.
Example:
Complete Minimal Valid XSLT Example:
Why Other Options Are Incorrect:
A. A root element, namespace, and at least one transformation: While this is close, "transformation" is not a precise term in XSLT. The correct requirement is a "template," which defines the transformation logic. "Transformation" might imply the overall process, but the specific feature required in the file is a template.
C. A header, a footer, and a namespace: XSLT files do not require a "header" or "footer." These terms are not part of XSLT or XML standards. The structure is defined by the root element and templates, not headers or footers, making this option invalid.
D. A template, a prefix, and a header: While a template is required, "prefix" (likely referring to the namespace prefix like xsl:) is not a standalone feature—it’s part of the namespace declaration within the root element. "Header" is not a required component, making this option incorrect.
Workday Context:
In Workday’s Document Transformation systems (e.g., Core Connectors or custom integrations), XSLT files are uploaded as attachment transformations. Workday enforces these requirements to ensure the stylesheets can process XML data (e.g., from Workday reports or connectors) into formats suitable for external systems. The Workday platform validates these components when an XSLT file is uploaded, rejecting files that lack a root element, namespace, or functional templates.
Workday Pro Integrations Study Guide References:
Workday Integration System Fundamentals: Describes the structure of XSLT files, emphasizing the need for a root element (
Document Transformation Module: Details the requirements for uploading valid XSLT files in Workday, including examples that consistently feature a root element, namespace declaration, and at least one template (e.g., "XSLT Basics for Document Transformation").
Core Connectors and Document Transformation Course Manual: Provides sample XSLT files used in labs, all of which include these three components to ensure functionality within Workday integrations.
Workday Community Documentation: Reinforces that XSLT files must be well-formed XML with an XSLT namespace and at least one template to be processed correctly by Workday’s integration engine.
Refer to the scenario. You are implementing a Core Connector: Worker integration to send employee data to a third-party active employee directory. The external vendor requires the following:
The Employee's Active Directory User Principal Name.
A mapping from Worker Type values to external worker type codes.
A specific filename format that includes a timestamp and sequence number.
You also need to ensure the document transformation occurs before the file is delivered to the endpoint. You must include an Employee’s Active Directory User Principal Name (generated by a Calculated Field).
How do you ensure this field is pulled into the output?
Configure an integration map.
Configure an integration field override.
Configure an integration field attribute.
Configure an integration attribute.
To surface a Calculated Field in a Core Connector: Worker (CCW) outbound, you use an Integration Field Override to substitute the connector’s default source with your calculated value. An integration map (Option A) is intended to translate or normalize code values (for example, mapping internal Worker Type codes to the vendor’s codes), not to replace the source of a field. Integration attributes (Option D) and integration field attributes (Option C) manage connector behavior and attributes, but they do not replace a field’s data source with a calculated field. Therefore, the correct method to “pull” a calculated field into the CCW output is an Integration Field Override (Option B).
Why the other elements in the scenario matter (and how they’re handled) — with exact extracts from your materials:
Mapping Worker Type to external codes → Integration Maps (supports, but not the asked action):Your deployment guides call out maintaining and using Integration System Maps for code translations. This is exactly where you’d map “Worker Type” to the external system’s codes, but it is not how you inject a calculated field into the payload.
“Maintenance of Integration System Maps”
“WORKDAY SETUP – NON STATIC MAPS” and “WORKDAY SETUP – STATIC MAPS” (table of contents for configuration of maps)
Filename requires timestamp/sequence number → Sequence Generator (supports the scenario):Your Time Tracking/PECI deployment guide explicitly includes a Sequence Generator configuration that’s used with certified connectors to build compliant, unique file names (often with timestamps and/or sequence numbers) before delivery.
“3.6 Sequence Generator” (configuration item for certified integrations used in file naming)
Transformation before delivery → Standard integration flow (transform then deliver):The same deployment materials describe document/file delivery mechanics (for example, SFTP), which occur after the integration produces/transforms the document. This supports the scenario requirement that transformation happens prior to transmission.
“4. FILE DELIVERY SERVICE … 4.4 SFTP Configuration” (document delivery occurs after the integration generates/transforms the output)
Security posture for integrations (context):For outbound/system users and secure delivery, the Workday Authentication & Security guide documents integration-appropriate authentication (e.g., X.509) and general integration security steps — relevant background for productionizing CCW but not directly affecting how to bring a calculated field into the payload.
“X509 Recommended for web services users and integrations that use an integration system user account.”
Putting it all together for the scenario:
Use Integration Field Override to point the CCW field to your Calculated Field for UPN → (Correct answer: B).
Use Integration Maps to translate Worker Type to the vendor’s codes (supports the mapping requirement).
Configure filename rules via Sequence Generator to include timestamp and sequence in the produced file name (supports the file-naming requirement).
Ensure the document transformation runs as part of the integration generation step and then deliver via SFTP (file delivery service).
References (Workday Pro: Integrations-aligned materials):
GPC_PECI_TimeTracking_DeploymentGuide_CloudPay.pdf — Sections “3.6 Sequence Generator” and “4. File Delivery Service” (delivery occurs after file generation/transform).
GPC_PECI_DeploymentGuide_CloudPay_2.9.pdf — Map configuration sections (“WORKDAY SETUP – NON STATIC MAPS”, “WORKDAY SETUP – STATIC MAPS”).
GPC_PECI_UserGuide_CloudPay_2.1.1.pdf — “Maintenance of Integration System Maps.”
Admin-Guide-Authentication-and-Security.pdf — Integration security notes, including X.509 recommendation for integrations.
What is the task used to upload a new XSLT file for a pre-existing document transformation integration system?
Edit Integration Attachment
Edit Integration Attachment Service
Edit XSLT Attachment Transformation
Edit Integration Service Attachment
In Workday, when you need to upload a new XSLT (Extensible Stylesheet Language Transformations) file to modify or replace an existing transformation within a pre-existing document transformation integration system, the specific task required is "Edit XSLT Attachment Transformation." This task allows users to update the XSLT file that governs how XML data is transformed within the integration system without creating an entirely new transformation object.
Here’s why this is the correct answer:
Workday’s integration systems often rely on XSLT to transform XML data into the desired format for downstream systems or processes. When an XSLT file has already been associated with an integration system (e.g., as part of an Enterprise Interface Builder (EIB) or a Document Transformation Connector), updating it requires accessing the existing transformation configuration.
The "Edit XSLT Attachment Transformation" task enables users to upload a revised version of the XSLT file. This action replaces the previous file while maintaining the integration system’s configuration, ensuring continuity without necessitating additional changes to the system itself.
This task is distinct from other options because it specifically targets the transformation logic (XSLT) rather than broader integration components or services.
Let’s examine why the other options are incorrect:
A. Edit Integration Attachment: This task is used to manage generic attachments associated with an integration, such as input files or supplementary documents, but it does not specifically address XSLT transformations. It lacks the precision required for updating transformation logic.
B. Edit Integration Attachment Service: This is not a recognized task in Workday’s integration framework. It appears to be a conflation of terms and does not align with the documented processes for managing XSLT files.
D. Edit Integration Service Attachment: While this might suggest modifying an attachment related to an integration service, it is not the correct task for handling XSLT files in a document transformation context. Workday documentation consistently points to "Edit XSLT Attachment Transformation" for this purpose.
The process typically involves:
Navigating to the integration system in Workday (e.g., via the "Search" bar by entering the integration system name).
Using the related actions menu to select "Integration System" > "Edit XSLT Attachment Transformation."
Uploading the new XSLT file, which must comply with Workday’s size limitations (e.g., 30 MB for attachments) and be properly formatted.
Saving the changes, which updates the transformation logic without altering other integration configurations.
This approach ensures that transformations remain aligned with business requirements, such as reformatting data for compatibility with external systems, while leveraging Workday’s secure and efficient integration tools.
Workday Pro Integrations Study Guide: "Configure Integration System - TRANSFORMATION" section, which details the use of XSLT files in document transformations and the associated tasks.
Workday Documentation: "Enterprise Interface Builder (EIB)" and "Document Transformation Connector" sections, where the "Edit XSLT Attachment Transformation" task is outlined for updating XSLT files.
Workday Community: Guidance on managing XSLT attachments, confirming this task as the standard method for updating pre-existing transformations.
You are creating an outbound connector using the Core Connector: Job Postings template. The vendor has provided the following specification for worker subtype values:
The vendor has also requested that any output file have the following format "CC_Job_Postings_dd-mm-yy_#.xml". Where the dd is the current day at runtime, mm is the current month at runtime, yy is the last two digits of the current year at runtime, and # is the current value of the sequencer at runtime. What configuration step(s) must you complete to meet the vender requirements?
• Enable the Sequence Generator Field Attribute • Configure the Sequence Generator • Configure the Worker Sub Type Integration Mapping leaving the default value blank
• Enable the Integration Mapping Field Attribute • Configure the Worker Sub Type Integration Mapping leaving the default value blank • Configure the Sequence Generator
• Enable the Integration Mapping Integration Service • Configure the Worker Sub Type Integration Mapping and include a default value of "U" • Configure the Sequence Generator
• Enable the Sequence Generator Integration Service • Configure the Sequence Generator • Configure the Worker Sub Type Integration Mapping and include a default value of "U"
This question involves configuring an outbound connector using the Core Connector: Job Postings template in Workday Pro Integrations. We need to meet two specific vendor requirements:
Map worker subtype values according to the provided table (e.g., Seasonal (Fixed) = "S", Regular = "R", Contractor = "C", Consultant = "C", and any other value = "U").
Format the output file name as "CC_Job_Postings_dd-mm-yy_#.xml", where:
"dd" is the current day at runtime,
"mm" is the current month at runtime,
"yy" is the last two digits of the current year at runtime,
"#" is the current value of the sequencer at runtime.
Let’s break down the requirements and evaluate each option to determine the correct configuration steps.
Understanding the Requirements
1. Worker Subtype Mapping
The vendor provides a table for worker subtype values:
Internal Seasonal (Fixed) maps to "S"
Internal Regular maps to "R"
Internal Contractor maps to "C"
Internal Consultant maps to "C"
Any other value should be assigned "U"
In Workday, worker subtypes are typically part of the worker data, and for integrations, we use integration mappings to transform these values into the format required by the vendor. The integration mapping allows us to define how internal Workday values (e.g., worker subtypes) map to external values (e.g., "S", "R", "C", "U"). If no specific mapping exists for a value, we need to set a default value of "U" for any unmatched subtypes, as specified.
This mapping is configured in the integration system’s "Integration Mapping" or "Field Mapping" settings, depending on the template. For the Core Connector: Job Postings, we typically use the "Integration Mapping" feature to handle data transformations, including setting default values for unmapped data.
2. Output File Name Format
The vendor requires the output file to be named "CC_Job_Postings_dd-mm-yy_#.xml", where:
"CC_Job_Postings" is a static prefix,
"dd-mm-yy" represents the current date at runtime (day, month, last two digits of the year),
"#" is the current value from a sequence generator (sequencer) at runtime.
In Workday, file names for integrations are configured in the "File Utility" or "File Output" settings of the integration. To achieve this format:
The date portion ("dd-mm-yy") can be dynamically generated using Workday’s date functions or runtime variables, often configured in the File Utility’s "Filename" field with a "Determine Value at Runtime" setting.
The sequence number ("#") requires a sequence generator, which is enabled and configured to provide a unique incrementing number for each file. Workday uses the "Sequence Generator" feature for this purpose, typically accessed via the "Create ID Definition / Sequence Generator" task.
The Core Connector: Job Postings template supports these configurations, allowing us to set filename patterns in the integration’s setup.
Evaluating Each Option
Let’s analyze each option step by step, ensuring alignment with Workday Pro Integrations best practices and the vendor’s requirements.
Option A:
• Enable the Sequence Generator Field Attribute
• Configure the Sequence Generator
• Configure the Worker Sub Type Integration Mapping leaving the default value blank
Analysis:
Sequence Generator Configuration: Enabling the "Sequence Generator Field Attribute" and configuring the sequence generator is partially correct for the file name’s "#" (sequencer) requirement. However, "Sequence Generator Field Attribute" is not a standard term in Workday; it might refer to enabling a sequence generator in a field mapping, but this is unclear and likely incorrect. Sequence generators are typically enabled as an "Integration Service" or configured in the File Utility, not as a field attribute.
Worker Subtype Mapping: Configuring the worker subtype integration mapping but leaving the default value blank is problematic. The vendor requires any unmapped value to be "U," so leaving it blank would result in missing or null values, failing to meet the requirement.
Date in Filename: This option doesn’t mention configuring the date ("dd-mm-yy") in the filename, which is critical for the "CC_Job_Postings_dd-mm-yy_#.xml" format.
Conclusion: This option is incomplete and incorrect because it doesn’t address the default "U" for unmapped subtypes and lacks date configuration for the filename.
Option B:
• Enable the Integration Mapping Field Attribute
• Configure the Worker Sub Type Integration Mapping leaving the default value blank
• Configure the Sequence Generator
Analysis:
Sequence Generator Configuration: Configuring the sequence generator addresses the "#" (sequencer) in the filename, which is correct for the file name requirement.
Worker Subtype Mapping: Similar to Option A, leaving the default value blank for the worker subtype mapping fails to meet the vendor’s requirement for "U" as the default for unmapped values. This would result in errors or null outputs, which is unacceptable.
Date in Filename: Like Option A, there’s no mention of configuring the date ("dd-mm-yy") in the filename, making this incomplete for the full file name format.
Integration Mapping Field Attribute: This term is ambiguous. Workday uses "Integration Mapping" or "Field Mapping" for data transformations, but "Field Attribute" isn’t standard for enabling mappings. This suggests a misunderstanding of Workday’s configuration.
Conclusion: This option is incomplete and incorrect due to the missing default "U" for worker subtypes and lack of date configuration for the filename.
Option C:
• Enable the Integration Mapping Integration Service
• Configure the Worker Sub Type Integration Mapping and include a default value of "U"
• Configure the Sequence Generator
Analysis:
Sequence Generator Configuration: Configuring the sequence generator is correct for the "#" (sequencer) in the filename, addressing part of the file name requirement.
Worker Subtype Mapping: Including a default value of "U" for the worker subtype mapping aligns perfectly with the vendor’s requirement for any unmapped value to be "U." This is a strong point.
Date in Filename: This option doesn’t mention configuring the date ("dd-mm-yy") in the filename, which is essential for the "CC_Job_Postings_dd-mm-yy_#.xml" format. Without this, the file name requirement isn’t fully met.
Integration Mapping Integration Service: Enabling the "Integration Mapping Integration Service" is vague. Workday doesn’t use this exact term; instead, integration mappings are part of the integration setup, not a separate service. This phrasing suggests confusion or misalignment with Workday terminology.
Conclusion: This option is partially correct (worker subtype mapping) but incomplete due to the missing date configuration for the filename and unclear terminology.
Option D:
• Enable the Sequence Generator Integration Service
• Configure the Sequence Generator
• Configure the Worker Sub Type Integration Mapping and include a default value of "U"
Analysis:
Sequence Generator Configuration: Enabling the "Sequence Generator Integration Service" and configuring the sequence generator addresses the "#" (sequencer) in the filename. While "Sequence Generator Integration Service" isn’t a standard term, it likely refers to enabling and configuring the sequence generator functionality, which is correct. In Workday, this is done via the "Create ID Definition / Sequence Generator" task and linked in the File Utility.
Worker Subtype Mapping: Configuring the worker subtype integration mapping with a default value of "U" meets the vendor’s requirement for any unmapped value, ensuring "S," "R," "C," or "U" is output as specified in the table. This is accurate and aligns with Workday’s integration mapping capabilities.
Date in Filename: Although not explicitly mentioned in the steps, Workday’s Core Connector: Job Postings template and File Utility allow configuring the filename pattern, including dynamic date values ("dd-mm-yy"). The filename "CC_Job_Postings_dd-mm-yy_#.xml" can be set in the File Utility’s "Filename" field with "Determine Value at Runtime," using date functions and the sequence generator. This is a standard practice and implied in the configuration, making this option complete.
Conclusion: This option fully addresses both requirements: worker subtype mapping with "U" as the default and the file name format using the sequence generator and date. The terminology ("Sequence Generator Integration Service") is slightly non-standard but interpretable as enabling/configuring the sequence generator, which is correct in context.
Final Verification
To confirm, let’s summarize the steps for Option D and ensure alignment with Workday Pro Integrations:
Enable the Sequence Generator Integration Service: This likely means enabling and configuring the sequence generator via the "Create ID Definition / Sequence Generator" task, then linking it to the File Utility for the "#" in the filename.
Configure the Sequence Generator: Set up the sequence generator to provide incremental numbers, ensuring each file has a unique "#" value.
Configure the Worker Sub Type Integration Mapping with a default value of "U": Use the integration mapping to map Internal Seasonal (Fixed) to "S," Regular to "R," Contractor to "C," Consultant to "C," and set "U" as the default for any other value. This is done in the integration’s mapping configuration.
Filename Configuration (Implied): In the File Utility, set the filename to "CC_Job_Postings_dd-mm-yy_#.xml," where "dd-mm-yy" uses Workday’s date functions (e.g., %d-%m-%y) and "#" links to the sequence generator.
This matches Workday’s documentation and practices for the Core Connector: Job Postings template, ensuring both requirements are met.
Why Not the Other Options?
Options A and B fail because they leave the default worker subtype value blank, not meeting the "U" requirement.
Option C fails due to missing date configuration for the filename and unclear terminology ("Integration Mapping Integration Service").
Option D is the only one that fully addresses both the worker subtype mapping (with "U" default) and implies the filename configuration, even if the date setup isn’t explicitly listed (it’s standard in Workday).
Supporting Documentation
The reasoning is based on Workday Pro Integrations best practices, including:
Workday Tutorial: Activity Creating Unique Filenames from EIB-Out Integrations – Details on using sequence generators for filenames.
Workday Tutorial: EIB Features – Explains integration mappings and default values.
Get_Sequence_Generators Operation Details – Workday API documentation on sequence generators.
Workday Advanced Studio Tutorial – Covers Core Connector templates and file name configurations.
r/workday Reddit Post: How to Create a New Sequence Generator for Filename for EIB – Community insights on sequence generators.
You have successfully configured an ISU and an ISSG with the correct security policies and have assigned them to an EIB.
What task do you need to run before you can launch the EIB?
Activate Pending Security Policy Changes
View Security for Securable Item
Assign the ISSG to only one security policy
Maintain Integration Security Policies
In Workday, after configuring an Integration System User (ISU) and an Integration System Security Group (ISSG) with the appropriate security policies and assigning them to an Enterprise Interface Builder (EIB) integration, there is a critical step required before the EIB can be launched successfully. This step ensures that all security configurations and permissions assigned to the ISSG take effect in the Workday tenant. Let’s analyze the question and evaluate each option systematically to determine the correct task, ensuring the answer aligns with Workday’s documented processes and the Workday Pro Integrations Study Guide.
Context of the Scenario
You’ve completed the following:
Created an ISU and configured it (e.g., with "Do Not Allow UI Sessions" checked for web service-only access).
Set up an ISSG and assigned the ISU to it.
Defined the necessary security policies (e.g., domain security policies with "Get" and/or "Put" access) for the ISSG to support the EIB’s operations.
Assigned the ISU and ISSG to the EIB integration system.
The question now is what must be done before launching the EIB to ensure it functions as intended. In Workday, changes to security policies—such as adding permissions to an ISSG—do not take effect immediately. They remain in a "pending" state until activated, which is a key aspect of Workday’s security administration process.
Evaluation of Options
Option A: Activate Pending Security Policy ChangesIn Workday, whenever you modify security policies (e.g., granting domain permissions like "Integration Build" or "Custom Report Creation" to an ISSG), these changes are staged as "pending." To apply them to the tenant and make them active, you must run the "Activate Pending Security Policy Changes" task. This task reviews all pending security updates, allows you to add a comment for audit purposes, and, upon confirmation, activates the changes. Without this step, the ISSG will not have the effective permissions required for the EIB to access data or execute its operations, potentially causing the launch to fail due to insufficient authorization. This aligns directly with the scenario, as security policies have been configured and assigned, but not yet activated.
Option B: View Security for Securable ItemThe "View Security for Securable Item" report is a diagnostic tool in Workday that allows you to inspect the security configuration for a specific object (e.g., a web service operation, report, or task). It shows which security groups have access and what permissions (e.g., "Get," "Put," "View," "Modify") are granted. While this is useful for verifying that the ISSG has the correct policies assigned, it is a passive report—it does not modify or activate anything. Running this task would not enable the EIB to launch, as it doesn’t affect the pending security changes. Thus, it’s not the required step before launching the EIB.
Option C: Assign the ISSG to only one security policyThis option suggests limiting the ISSG to a single security policy, but this is neither a standard Workday requirement nor a task that exists as a standalone action. ISSGs can and often do have multiple security policies assigned (e.g., permissions for various domains like "Integration Build," "Custom Report Access," etc.), depending on the integration’s needs. Moreover, the question states that the ISSG has already been configured with the "correct security policies" and assigned to the EIB, implying this step is complete. Restricting the ISSG to one policy after the fact would require editing permissions again, triggering more pending changes, and still necessitate activation—making this option illogical and incorrect.
Option D: Maintain Integration Security PoliciesThere is no specific task in Workday called "Maintain Integration Security Policies." This option seems to be a misnomer or a conflation of other tasks, such as "Maintain Domain Permissions for Security Group" (used to assign permissions to an ISSG) or broader security maintenance activities. However, the question indicates that the security policies are already correctly configured and assigned. If this option intended to imply further configuration, it would still result in pending changes requiring activation via Option A. As a standalone action, it does not represent a valid or necessary task to enable the EIB launch.
Why Option A is Correct
The "Activate Pending Security Policy Changes" task is a mandatory step in Workday’s security workflow after modifying security policies, such as those assigned to an ISSG for an EIB. Workday’s security model uses a pending changes queue to ensure that updates are reviewed and deliberately applied, maintaining control and auditability. Without activating these changes:
The ISSG will lack the effective permissions needed for the EIB to access required domains or perform its operations (e.g., retrieving data from a custom report or delivering a file).
The EIB launch could fail with errors like "Insufficient Privileges" or "Access Denied."
Running this task ensures that the security configuration is live, allowing the ISU (via the ISSG) to authenticate and execute the EIB successfully. This is a standard practice in Workday integration setup, as emphasized in the Workday Pro Integrations curriculum.
Practical Steps to Perform Option A
Log into the Workday tenant with a security administrator role.
Search for and select the "Activate Pending Security Policy Changes" task.
Review the list of pending changes (e.g., new permissions added to the ISSG).
Enter a comment (e.g., "Activating security for EIB launch – ISSG permissions").
Check the "Confirm" box and click "OK" to activate the changes.
Once completed, the security policies are live, and the EIB can be launched.
Verification with Workday Documentation
The Workday Pro Integrations Study Guide and related training materials confirm that activating pending security policy changes is a prerequisite after configuring security for integrations. This step ensures that all permissions are in effect, enabling the ISU and ISSG to support the EIB’s functionality. Community resources and implementation guides also consistently highlight this task as the final step before launching integrations that rely on updated security settings.
Workday Pro Integrations Study Guide References
Section: Integration Security Configuration – Explains the process of assigning security policies to ISSGs and the need to activate changes to operationalize them.
Section: Enterprise Interface Builder (EIB) – Notes that security updates for EIBs must be activated before launching to ensure proper access.
Section: Security Administration – Details the "Activate Pending Security Policy Changes" task as the mechanism to apply pending security modifications across the tenant.
TESTED 15 Dec 2025
